Updated 30 September 2026
Prime a well pump by shutting off power, opening the priming plug, filling the pump housing and suction line completely with water, sealing it back up, then running the pump until it delivers a steady flow. Submersible pumps are self-priming and rarely need this process.
Most homeowners who search how to prime a well pump own a jet pump, and that matters, because the USGS identifies jet pumps as the standard choice for shallow wells of 25 feet or less, mounted above ground where they can lose their prime. Submersible pumps, sitting inside the well casing itself, almost never need this step at all.
A pump that has lost its prime cannot move water no matter how long it runs, and running it dry risks burning out the motor. The Department of Energy notes that water-related systems are a significant, constant draw on a home’s electrical use, so a pump cycling uselessly with no water moving is wasted power on top of the wear it causes.
The confusion between pump types trips up a lot of first-time troubleshooting. Priming applies almost exclusively to jet pumps and other suction-based systems, not the submersible pumps common in deeper wells.
How to Prime a Well Pump: Step by Step
- Shut off power to the pump. Turn off the circuit breaker feeding the pump before touching any fitting. Priming involves opening the pump housing, and it should never happen with the motor live.
- Locate the priming plug. Most jet pumps have a plug on the top of the pump housing, sometimes labeled, used specifically for filling the system with water before startup.
- Close the shutoff valve on the discharge side. This keeps water from draining back out while you fill the system, and it lets pressure build once the pump restarts.
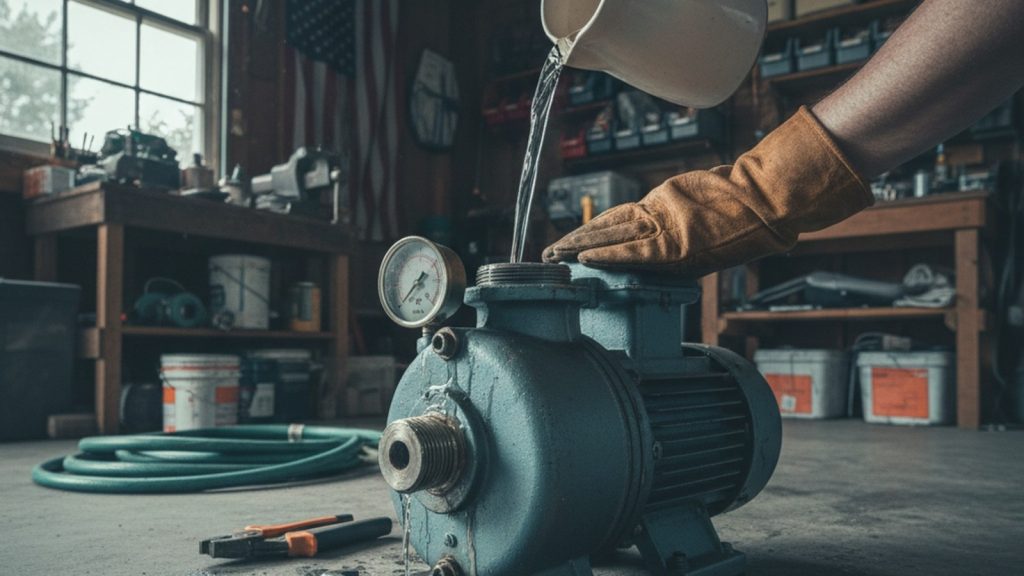
- Remove the priming plug and fill the housing. Pour clean water into the opening using a funnel until it is completely full, including the suction line if it has its own fill point. Air pockets left behind are the most common reason priming fails on the first attempt.
- Check the foot valve. If the suction line will not hold water and keeps draining back down, the foot valve at the bottom of the intake pipe is likely stuck open or worn out and needs replacing before priming will hold.
- Replace the priming plug securely. Tighten it enough to seal fully; a loose plug lets air back into the system and undoes the fill.
- Restore power and open the discharge valve slightly. Turn the breaker back on and crack the discharge valve to let trapped air escape as the pump builds pressure.
- Run until flow is steady. Let the pump run for several minutes, checking for a strong, consistent stream rather than sputtering. Sputtering means air is still in the line and the fill step needs to be repeated.
Always cut power at the breaker before opening any part of a well pump system, not just the switch on the pump itself. Water and live electrical components are a dangerous combination, and a pump that starts unexpectedly while the housing is open can cause serious injury.
Priming With a Garden Hose
For a large pump housing, a hose beats pouring by hand. Connect it from another water source, a neighbor’s spigot or a city supply if one is reachable, to the priming port or a tee on the suction side, and let it run until water flows steadily out of the open prime plug with no air bubbles. Keep the pump powered off until the housing is completely full. One caution: if the hose water did not come from a treated supply, plan a bacteria retest afterward, since outside water has entered the system.
This guide sits in our Wells & Pumps section alongside the replacement how to and the submersible versus jet comparison.
Priming a Pump That Has Been Sitting Unused
A pump idle for months, a seasonal cabin, a backup well, usually needs more than one fill. Seals and gaskets dry out while the pump sits, so the first attempt often leaks air past the shaft seal. Fill the housing, wait fifteen to twenty minutes so the seals rehydrate and swell, top it off, then start the pump. If it still won’t hold prime after two or three soak-and-fill cycles, the shaft seal or foot valve has likely failed from the dry spell and needs replacement rather than another fill.
What Priming Fixes, and What It Cannot
A jet pump moves water by creating suction, and that suction only works inside a sealed system with no air pockets. Once air gets in, whether from a power outage that let the line drain, a repair that opened a fitting, or a slow leak, the pump spins without moving any water at all.
Priming replaces that trapped air with water, restoring the seal the pump needs to build suction again. It is a mechanical fix for a specific, physical problem, not a general troubleshooting step to try whenever water pressure seems low for an unrelated reason.
Priming Challenges That Stop the Process Cold
A worn foot valve is the most common reason priming fails repeatedly. If the valve does not seal, water drains back down the suction line between attempts, and no amount of refilling solves the underlying leak.
A suction line leak above the water line has the same effect. Even a small crack or a loose fitting lets air into the line under vacuum, which keeps the pump from building the suction it needs to draw water up from the well.
Well depth beyond a jet pump’s suction limit is the third challenge, and it cannot be fixed by priming harder. Standard jet pumps typically top out around 25 feet of suction lift; a well deeper than that needs a deep-well jet pump with an ejector assembly, or a switch to a submersible pump entirely.
Which pump type a well actually needs in the first place depends on depth. Our submersible vs jet well pump comparison covers where a shallow jet pump stops being the right choice.
What to Do When Priming Keeps Failing
Inspect every fitting on the suction side for air leaks, since a hairline crack is easy to miss on a visual check alone. A soapy water test along each joint, watching for bubbles while the pump runs, finds leaks a dry inspection misses.
If the pump primes successfully but then starts rapid, short cycles once running, the problem has shifted from priming to the pressure tank. That pattern usually points to a waterlogged tank that has lost its air charge, not a fresh air leak on the suction side.
Pull and inspect the foot valve directly if the line will not hold water between attempts. A valve with debris caught in the seal, or one that has simply worn out, needs cleaning or replacement before the system can hold prime.
A pump that primed fine last year and suddenly will not this year usually has a new leak or a failed foot valve, not a mysterious pump problem. Chase the suction side first before assuming the pump itself needs replacing.
Repeated priming failures on an older pump are sometimes a sign the pump itself is wearing out rather than a simple air leak. A faulty well pump pressure switch can also mimic priming problems by cycling the pump oddly, so it is worth ruling out before assuming the worst.
Keep a small funnel and a spare priming plug gasket near the pump. Having both on hand turns a priming job into a five-minute task instead of a trip to the hardware store mid-repair.
How to Know When It Is Time to Replace, Not Prime
A pump that needs priming every few days, even with no detectable leak, is telling you something mechanical has changed inside it. Repeated priming is a workaround, not a fix, once the pattern becomes routine instead of occasional.
Track how often the priming process repeats. Once or twice a year after a power outage is normal wear on an aging system; weekly priming points to a foot valve, suction line, or pump problem that needs a proper repair.
If priming keeps failing after checking the foot valve and every suction fitting, the pump has likely reached the end of its working life. Learn how to replace a well pump to see what the full job actually involves before calling a contractor.
A pump that will not hold prime is one of several symptoms with more than one cause. Our pump failure signs guide maps each symptom to its likely causes and the safe check for each.
Frequently Asked Questions (FAQs)
When does a well pump need priming?
A pump needs priming when air has entered the suction line or pump housing, usually after a power outage, a repair that opened the system, or a worn foot valve that lets water drain back down. Submersible pumps almost never need this step since they stay submerged in the well.
Why won’t my pump prime?
The most common causes are a worn foot valve that will not hold water, an air leak somewhere on the suction line, or well depth beyond the pump’s suction lift capacity. Check the foot valve and every suction fitting before assuming the pump itself has failed.
Jet vs submersible priming, what’s the difference?
Jet pumps mount above ground and rely on suction to pull water up, which means they can lose their prime and need refilling. Submersible pumps sit inside the well casing surrounded by water and are self-priming, so they essentially never need this process.
How long does priming take?
A straightforward priming job, filling the housing and running the pump until flow is steady, usually takes 10 to 20 minutes. Add time if a suction leak or a stuck foot valve needs tracking down first.
Can I prime a well pump myself?
Yes, priming a jet pump is a task most homeowners can handle with a funnel, clean water, and the power shut off at the breaker. If priming repeatedly fails after checking for leaks and the foot valve, that is the point to call a well pump professional.